Install the agent on Windows
To start monitoring your devices, it is essential to install the DCA and Cloud Connector agent. This installation can be done in two ways: manually or silently.
If the gateway is used for communication between the agent and the portal, install the Gateway Connector before installing the DCA and Cloud Connector agent.
Running the DCA and Cloud Connector requires two prerequisites: the Microsoft .NET Runtime and Microsoft ASP.NET Core Runtime applications. These applications provide the necessary components for the agent to work.
Before installing the agent, the installer will check whether the Microsoft .NET Runtime and Microsoft ASP.NET Core Runtime applications are already present on the computer. If not, the installer will automatically install these applications.
Do not uninstall the Microsoft .NET Runtime and Microsoft ASP.NET Core Runtime applications from the computer. Removing these applications will cause the DCA and Cloud Connector agent and its services to malfunction.
Instructions
Installing the agent manually
Create the customers where the agents will be installed
Check the installation prerequisites
Download the agent installer:
NDD_DCAandCloudConnector_1.1.16.exe
Run the installed file
Select the desired language and click on PrĂłximo
First, the prerequisites (Microsoft .NET Runtime and Microsoft ASP.NET Core Runtime applications) will be installed. If the applications are already installed on your computer, steps 3 to 5 will be skipped and the installation will proceed from step 6.
Click Next on the prerequisite installation welcome screen
Click Next to start installing the prerequisites
Wait for installation
Once the prerequisites have been installed, the installation of the DCA and Cloud Connector agent will begin.
Click Next on the agent installation welcome screen
Choose the Installation folder and Work folder and click Next
Enter the Provider name and Customer identification key and click Next
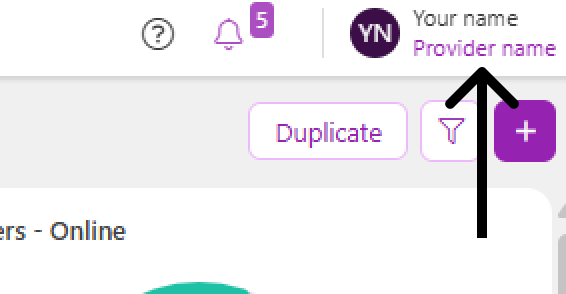
To find the provider name in the NDD Orbix portal, click above your name in the upper right corner. Under My Data, the provider name information will be displayed below your name.
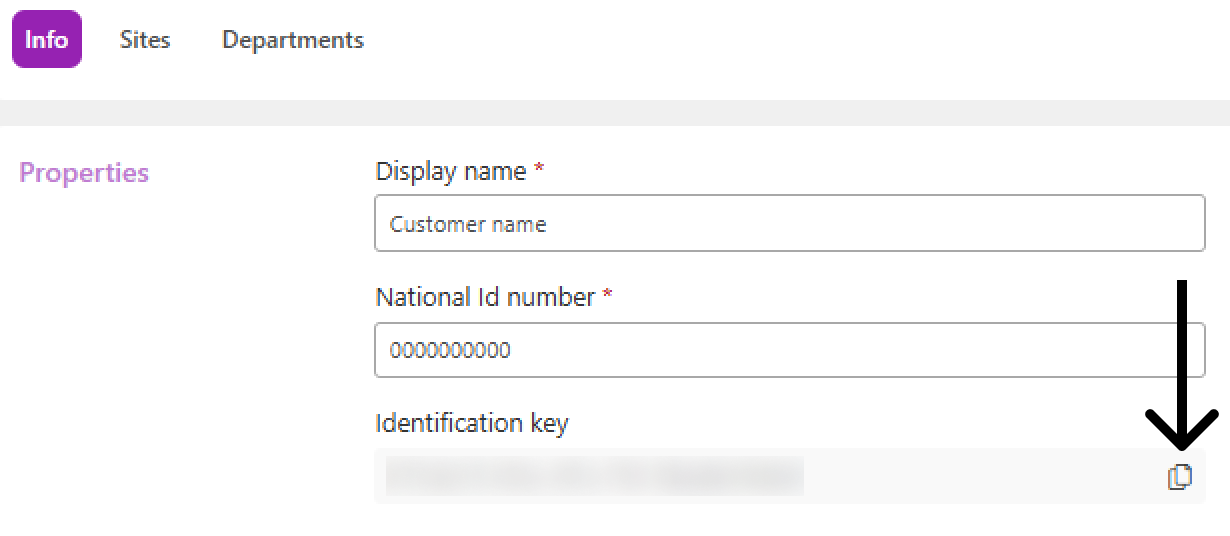
To find the customer's identification key in the NDD Orbix portal:
Go to the Administration > Customers menu
Click on the name of the desired customer to open its properties
In the Info tab, copy the Identification key
Under Additional settings, if desired, select the type of communication (proxy or gateway) and click Next
If no option is selected, communication will take place directly between the agent and the portal
If Use proxy for communication with NDD Orbix servers is selected, enter the necessary proxy connection settings (address, port and authentication, if any) and click Next
If Use Gateway Connector to communicate with NDD Orbix servers option is selected, enter the address (IP or hostname) of the computer/server where the Gateway Connector was installed and click Next
The port will already be filled in with the default, but you can change it if you wish.
Click Install
Wait for installation and click Finish
Next, enable and configure the network printer monitoring service rules.
Install the agent silently
Create the customers where the agents will be installed
Check the installation prerequisites
Download the agent installer:
NDD_DCAandCloudConnector_1.1.16.exe
Run the downloaded file via Command Prompt
Navigate to the directory where the agent executable is located via Command Prompt
Pass the name of the executable with the other parameters
Example:
C:\Downloads\DCA> NDD_DCAandCloudConnector_1.1.13.exe TENANTNAME=Company ORGANIZATIONNAME=00000000-0000-0000-0000-000000000000 /quiet
DCA and Cloud Connector silent installation parameters
The parameters with "*" are mandatory and must be observed.
The parameters with "**" may become mandatory depending on other parameters used.
APPDIR – Configures the installation directory of DCA and Cloud Connector
Setup option: enter the path where you want to install the agent.
Requirement: optional.
Behavior if not configured: installs in the default directory: C:\Program Files (x86)\NDD TECH\DCA and Cloud Connector.
Example: APPDIR=C:\test
WORKFOLDER – Configures the directory of the DCA and Cloud Connector work folder
Setup option: enter the path where you want to create the agent's work folder.
Requirement: optional.
Behavior if not configured: installs in the default directory: C:\NDD TECH\Workfolder.
Example: WORKFOLDER=C:\test
*TENANTNAME – Configures the name of the company registered on the server
Setup option: enter the name of the provider.
To find the provider name in the NDD Orbix portal, click above your name in the upper right corner. Under My Data, the provider name information will be displayed below your name.
Requirement: mandatory.
Behavior if not configured: installation will not take place.
Example: TENANTNAME=Company
*ORGANIZATIONNAME – Configures the customer registered on the server
Setup option: enter the customer's identification key.
To find the customer's identification key in the NDD Orbix portal:
Go to the Administration > Customers menu
Click on the name of the desired customer to open its properties
In the Info tab, copy the Identification key
Requirement: mandatory.
Behavior if not configured: installation will not take place.
Example: ORGANIZATIONNAME=00000000-0000-0000-0000-000000000000
ENABLEPROXY – Enables the use of the proxy
Setup option: checked = enabled.
Requirement: optional (do not use the parameter if you do not want the proxy to be enabled).
Behavior if not configured: proxy will not be enabled.
Example: ENABLEPROXY=checked
**PROXYADDRESS – Configures the proxy server address
Setup option: enter the proxy address.
Requirement: mandatory if proxy use is enabled (ENABLEPROXY=checked).
Behavior if not configured: proxy will not be configured correctly.
Example: PROXYADDRESS=192.168.17.10
**PROXYPORT – Configures the communication port of the proxy server
Setup option: enter the proxy port number.
Requirement: mandatory if proxy use is enabled (ENABLEPROXY=checked).
Behavior if not configured: proxy will not be configured correctly.
Example: PROXYPORT=12
ENABLEGATEWAY - Enables the use of the gateway
Setup option: checked = enabled.
Requirement: optional (do not use the parameter if you do not want the gateway to be enabled).
Behavior if not configured: gateway will not be enabled.
Example: ENABLEGATEWAY=checked
**GATEWAYADDRESS - Configures the gateway address
Setup option: enter the address (IP or hostname) of the computer/server where the Gateway Connector was installed.
Requirement: mandatory if gateway use is enabled (ENABLEGATEWAY=checked).
Behavior if not configured: gateway will not be configured correctly.
Example: GATEWAYADDRESS=192.168.17.10
**GATEWAYPORT - Configures the communication port of the gateway
Setup option: enter the gateway port number.
The default gateway port is 9635, but you can enter another one if you wish.
Requirement: mandatory if gateway use is enabled (ENABLEGATEWAY=checked).
Behavior if not configured: gateway will not be configured correctly.
Example: GATEWAYPORT=12
{{component-feedback-article}}